

If you’re in the market for a high-quality in-dash receiver with a host of multimedia functions, the Pioneer AVH 120BT is a perfect entry-level unit to get you started. This car stereo receiver looks works great as it looks, plus the overall performance is far superior to OEM.
The best part about this receiver is that the Bluetooth response is flawless, and you can stream all your media wirelessly for an enhanced driving experience. It also offers you a great opportunity to integrate a range of music and USB files to allow you to enjoy music or watch videos while in your car.
Another thing that we liked about the AVH 120BT is that it comes in a closed-packed design, which makes it is to install the unit in most vehicles. However, wiring this Pioneer head unit is not always a walk in the park, especially if you don’t have prior experience.
In this article, we’ll provide you with a simplified Pioneer AVH 120BT wiring diagram to help you connect your head unit to your vehicle wiring. By following the diagrams illustrated below, you can rest assured that your connections are secure and that your head unit will work properly.
Quick Pioneer AVH-120BT Review
[amazon box=”B0812D5XDT” tracking_id=”ac-info-20″]
| Maximum power output | 50 W x 4 channels |
| Continuous power output | 22 W x 4channels |
| Load Impedance | 4-8 Ohms |
| Screen size | 6.2” |
| Type of screen | Resistive |
| Tuner | AM/FM |
| Bluetooth | AVRCP 1.6 |
Pioneer AVH 120BT Wiring Harness Diagram

Every car stereo may pose unique installation challenges, and the AVH 120BT is no exception. At times, the harness that works in your car may not work in another, so you may need to get more supplies to complete the installation.
Steps
i. Choose wiring adapter
To install the Pioneer AVH 120BT you’ll first need to get a special wiring adapter to let you incorporate the new unit into the car’s electronic system. Wiring adapters allow the operator to retain as much as OEM functions as possible while providing a safe platform for integrating new components into your existing car stereo.
ii. Pioneer AVH 120BT wiring harness color code
The next step that you’ll need to undertake when installing the AVH 120BT is connecting the wiring harness to the adapter before plugging it into the car. Sticking to the right color coding is critical in ensuring you make secure and long-lasting connections.
The first step in wiring any car radio or head unit is determining which color codes you need. The Pioneer AVH 120BT uses an ordinary wiring harness meaning the connections are relatively straightforward.
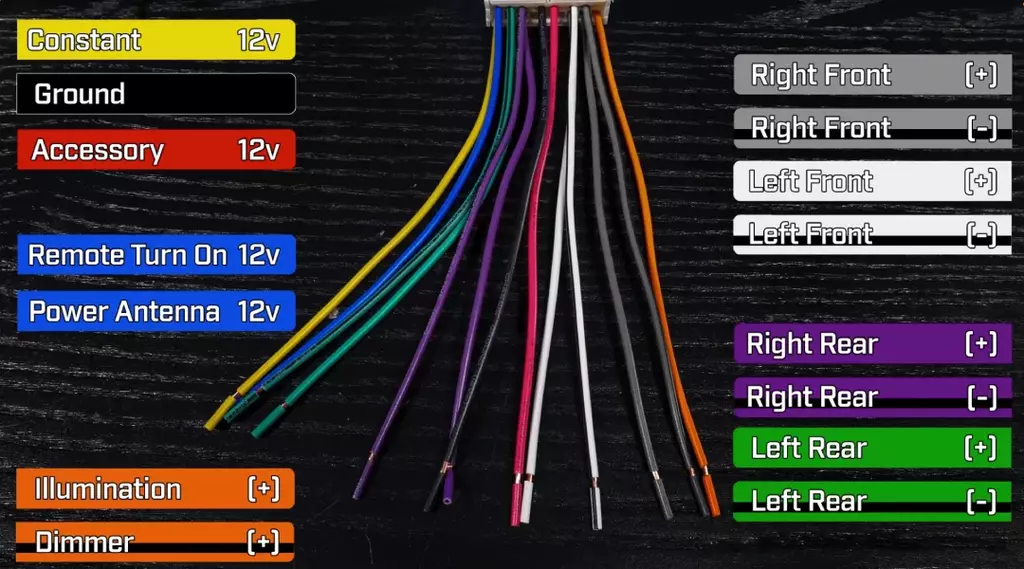
Color coding—What does each wire do?
- Yellow wire- This is a constant 12V wire that connects directly to the battery. The wire provides power to the head unit as well as memory backup.
- Blue wire – The blue wire acts as the remote turn on wire, also known as the power antennae. Just like the power wire, this wire delivers 12 volts out. This signal is used to trigger the antennae or turn on your factory amplifier.
- Red wire- The red lead is the accessory. This wire turns on with the key or when the car is ignited. This particular connection is what triggers your head unit to turn on.
- Black wire- Like in any other connection, black wire is used as the ground.
- Speaker leads-Next is the connection for the speakers, which will include;
- Green speaker leads for the left rear speaker
- Purple speaker leads for the right rear speaker
- White speaker lead for the left front channel
- Grey speaker leads for right front channel
- Orange wire- The orange wire is basically the illumination/ dimmer lead that hooks up the lighting terminal. The wire is typically 12 volts, but you can adjust between 0 and 12 volts as you adjust your dash lights.
- Light green wire- For the parking brake
Note: Always ensure to check both the Pioneer AVH 120BT installation manual and the above wiring harness diagram before you do the installation.
iii. The actual connection
Now that you have the color-coding complete, you can go ahead and make individual connections. The first thing you need to do is cut the wires to the appropriate length and to make your harness fit behind your dash.
Next, tape your power wires (i.e. yellow, red, and black) together. Taping them together will ensure a tidy appearance and make your speaker connections much easier. Next, cut the heat shrink tube, preferably the same size, for all the wires.
At this point, you can insert the heat shrink tubes and begin to solder the connections starting with the power wires, the speakers leads, and finally the rest of the wires. If soldering is not an option, you can choose butt connectors. The butt connectors are sized according to the wire gauge, so you’ll need to size accordingly.
The next thing you’ll need is to tape your harness to make it look clean while making it easy to tuck it behind your dash. Now that you have your harness complete you can go ahead and plug one end into your vehicle and the other one into the AVH 120BT.
Check if the unit is unit is functioning properly. If you have done everything and your unit does not turn on, the best thing is to plug in the harness and test the power leads. Use a voltmeter to ensure that both the accessory and constant wire are 12 volts each.
Frequently Asked Questions
Q: Does the AVH 120BT have video output?
Yes. Pioneer AVH 120BT lets you explore both audio and video playback while relaxing in your car. It allows you to enjoy playback from USB sources, DVDs, and much more.
Q: Can I install Pioneer AVH 120BT without the wiring harness adapter?
Yes. It is possible to install the head unit without the adapter provided that you can figure out the purpose of each wire. However, installing the head unit manually can be somewhat complicated for a standard DIYer.
Parting Shot!
Wiring a new car stereo can be intimidating, especially if you’re doing the installation for the first time. However, wiring the AVH 120BT shouldn’t be an uphill task, provided that you take your time to understand the connections. The entire connection should take just a couple of hours to have the unit installed and ready to rock.