
Do you desire to make your car’s electrical perform more efficiently for your car audio system? If so, you must have wondered how to install a capacitor to two amps. While some people buy parts and assemble them, others prefer professionals to do it for them. This article provides details on how to install a capacitor to two amps without any difficulties.
You must learn how to install a capacitor to two amps to get the most out of your capacitor and energy-saving devices. Capacitors are the component used through circuits in various electronic devices such as surge protectors, UPS systems, and security systems.
When installing such a component in your house, you should be able to determine how much you can use a capacitor for efficient work. There are different types of capacitors used for controlling voltage and current and storing excess energy from one circuit to another.
What is a Capacitor
A capacitor is a device that stores energy in an electrostatic field for later use. Capacitors may work as filters, voltage stabilizers, electronic circuits, and energy storage.
A capacitor’s value is measured in farads (F). One farad is the equivalent of one coulomb of the charge stored per volt (1 C/V). This is the amount of electric charge required to produce a current of one ampere flowing for one second through a conductor with a potential difference of one volt between its ends.
A capacitor is a passive two-terminal electrical component that stores energy in an electric field. It can be used to store static electricity, as in a lightning rod, or to control the flow of electronic signals, as in a filter capacitor. Capacitors are widely used in DC power supplies to provide a short-term working surface for high voltage electronics.
The basic operation of a capacitor consists of two plates connected by a dielectric medium, which acts as the storage space where electric charges are stored. When an electric charge is placed on one plate, it creates a potential difference between them. The magnitude of this difference depends upon the area of the plates and whether the charge is positive or negative.
A larger surface for storing charges results in larger capacitance. However, this also means that more charges must be stored per unit area and hence have less effect on circuit performance.
Capacitors are often used to smooth out fluctuations in direct current (DC) voltages produced by alternating current (AC). They do this by storing energy on one-half of the capacitor’s plates until an AC signal reaches them, then releasing it all at once (a process known as “flip-flop”). This technique improves efficiency.
Why Do You Need a Capacitor?
Capacitors are used in AC circuits to provide a smooth flow of electricity. They are also used in DC circuits to store energy. Capacitors are used in electronic circuits to filter unwanted noises and vibrations.
Capacitors can be considered passive devices, meaning they do not require any power source or energy source to work. They only consume power if they are charged up with an electric current.
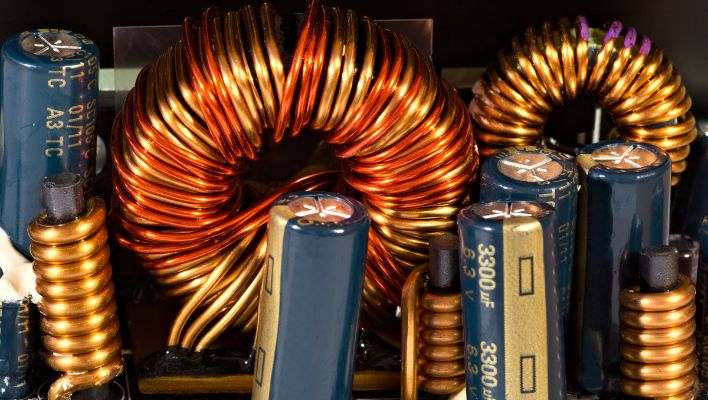
The most common type of capacitor is the electrolytic capacitor, which uses a liquid electrolyte as its conductive medium. It has two electrodes – one positive electrode and one negative electrode – separated by an insulating material called a dielectric.
The dielectric is usually composed of a paste composed of two components – glue-like material which holds the two electrodes together and a polymer or plastic film which prevents any leakage current from flowing between them during the charging/discharging cycles.
As we all know, capacitors have three main functions:
- Storing energy for future use.
- Filtering noise and vibration from electrical power lines.
- Providing high-frequency regulation for switching power supplies (AC/DC).
- Smoothing out AC power, so it doesn’t cause interference with other electronics on the same circuit board.
- Capacitors help protect against short-circuiting in a circuit by storing energy until it’s needed. This is achieved by having a large surface area (in the form of plates), which allows more charges to be stored and released.
- Capacitors do not need to be charged before use because they already have a full charge when manufactured. This means they can be used in any circuit without requiring additional components.
- Capacitors produce less heat than resistors or inductors; this means they are less likely to damage other parts of your circuit or burn out if left connected for too long.

How to wire a capacitor to two amps
Let’s assume you have a capacitor that is rated for 200 volts, and it has a capacitance of .01 microfarad. You want to connect this capacitor to two amps, so you need to use two 10-centimeter leads. Here’s how to do it:
Step 1#:
Identify the positive and negative leads on the capacitor. The lead labeled “positive” is the longer of the two and has a “+” sign on it. The smaller lead is labeled “negative.” This can vary depending on the type of capacitor you have.
Attach one lead of the capacitor to a power supply. This can be any DC power supply, such as a battery or wall outlet. Then attach the other lead of the capacitor to the ground.
Step 2#:
Connect one end of your wire to each positive lead (the longer lead), and connect the other end to each negative lead (the shorter lead). If your capacitor has three leads, you would connect one end to each positive lead, one to each negative lead, and then connect your ground wire to the third negative lead.
This will give you an electrical path between all four terminals. You will have an open circuit when the power supply is connected.
Step 3#:
Now connect one end of your 0-ohm resistor to positive (+), and the other end of your resistor is connected to ground (0V).
How to Install a Capacitor to Two Amps
The installation of a capacitor to two amps is an easy job, but it’s not as simple as you’d think.
Step 1#: The first step is removing all the old panels and wiring in the way.
Step 2#: You need to remove the old capacitor and replace it with a new one. You should disconnect the hot wire from both sides of the new capacitor, then connect them. To do this, you have to cut open one side of each wire with a razor or knife and connect them.
You may also have to use some tape or solder if your wires are not completely severed on both ends.
Step 3#: If you have a grounded wall outlet, attach a ground wire from that outlet to another metal hanging from your ceiling or wall above where you want to install your new capacitor. If not, leave it hanging until you finish installing everything else in your room (like all your cables).
Step 4#: Once that’s done, then you can go ahead with installing all your other components into place (like speakers, etc.). Once they’re in place, plug everything back in and enjoy the benefits of having improved sound quality.
2 Amps 1 Capacitor Wiring Diagram
The diagram below shows a simple illustration of how a 2 amps 1 capacitor circuit may be wired. This is just one possible setup, but it’s a good representation of the common two amp 1 capacitor circuit.
The 2 amp 1 capacitor wiring diagram is a type of electrical wiring that involves connecting an electrical device’s positive and negative wires into a single power wire. The positive and negative wires are connected at an end through a series or parallel connection.
This type of wiring is used in applications with more than one electrical device connected to the same power source.
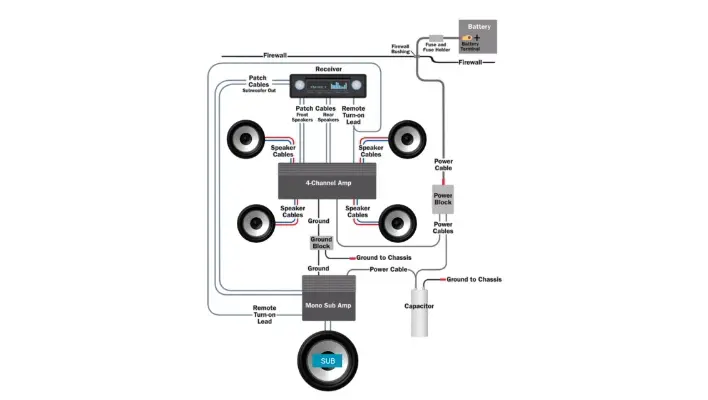
This section shows the wiring of a 2 amp and 3.3-volt capacitor. The diagram shows that a single wire goes from the positive terminal to the negative terminal of the capacitor.
You connect the positive lead of the capacitor to a power distribution block that connects to your primary power source, like the battery. Connect one amp directly from the capacitor’s positive lead using a power wire.
Connect the other amp to the power distribution block. From here, you can connect other speakers and the receiver.
Finally, ground one wire from the capacitor to the chassis.
It’s very important to make sure you wire multiple cables correctly when working with capacitors. If you don’t, they can explode or even catch fire. Be sure that all connections are made correctly, whether with solder or just connecting them by hand.
A capacitor is commonly connected in series with an inductor to decrease the voltage of a circuit.
What Size Capacitor Do You Need?
Capacitors are used to store energy (electricity) in an electronic circuit. They work by storing electrons, which is why they’re called capacitors. A capacitor can be used as a long-term storage device or as a short-term power source.
There are two main types of capacitors: Fixed and Variable. The size of the capacitor is determined by how much energy you want to store. The bigger your capacitor, the more energy you can store and hold onto for longer periods.
The most common sizes are electrolytic (which means they store electricity in an electrolyte solution) and film (which means they store electricity on a thin film). The bigger the capacity of a capacitor, the faster it will discharge its energy and dump all that stored charge back into your battery.
Capacitors come in different sizes: car and truck batteries have electrolytic caps (also known as “fuse” or “ring” caps), and starter batteries have filter caps. Car and truck batteries are usually much larger than starter batteries, which means that their electrolytic capacitors generally have higher capacities than their starter counterparts.
What to Do if the Capacitor is Not Working
If you find that your capacitor is not working, there are several things you can do:
- If your capacitor is not working, it may have been damaged by electrolysis. If this is the case, you can replace the capacitor with a new one.
- You can also try to check if it’s just a loose wire or if there is an internal problem.
- First of all, check for any obvious damage to the capacitor.
- If you find no visible damage to the capacitor, it may be necessary to replace it. If this is the case, ensure you know how to do this before attempting to repair or replace the capacitor.
- If you have replaced your capacitor and still have no power, then make sure that everything else is plugged in properly and that there are no other power sources in the area.
- Make sure that there is nothing blocking the power cord from being inserted into an outlet and that nothing is blocking the outlet from receiving electricity through the power cord.
- Suppose none of these things work, and you still cannot get any power into your device. In that case, you may need to contact an electrical technician to diagnose what is wrong with your device and get it fixed as soon as possible.
Final Word
That’s it! You now know how to install a capacitor to two amps. It is not very hard to do on your car stereo sound system. We have given you the right step-by-step technique to help you make the installation go even quicker. So, get out there and start installing.
This is a pretty simple task if you’re skilled at soldering or have another way of quickly inserting speaker wires without soldering. You need some basic electrical wiring knowledge and time to do it. It’s not something that needs to be done often. However, if you need it, make sure you are careful and follow the steps to avoid ruining your speakers. All the best in your installation journey.