
Most audio amplifiers come with a bridge mode feature which allows you to combine the available channels into one channel with a more powerful output. Normally, bridged amplifiers are mostly used in car audio applications to facilitate the transfer of a powerful mono signal to the subwoofer.
Adding a subwoofer to your car stereo helps lighten the load for the main speakers. However, in order for it to keep up with the rest of the components, it will need a huge amount of power. Now, can you use a 4 channel amp for 1 amp?
Yes. You can bridge a 4 channel amp to a single sub provided that the subwoofer has dual voice coils. A dual voice coil subwoofer offers more wiring flexibility while also allowing you to choose an ohm load that will better match your amplifier recommended rating.
Bridging a 4 channel amplifier to drive one subwoofer is relatively easy, but it is important to note that not all amplifiers are bridgeable. As such, in order for you to safely bridge your amplifier, you may want to check the amplifier’s documentation to avoid causing irreversible damage to your car audio system.
How to bridge a 4 channel amp to 1 sub
Step 1# identifying the amplifier layout
Once you’ve established if your 4 channel can be bridged, the first step involves taking note of the amplifier layout. Generally, a 4 channel amplifier should have a total of eight terminals i.e., one positive and one negative terminal for each channel as follows;
Channel 1 (+)
( -)
Channel 2 (+)
(-)
Channel 3 (+)
(-)
Channel 4 (+)
( -)
The good thing is that most bridgeable amplifiers indicate which terminals you need to use to facilitate bridging.
Note: Never attempt to bridge an amplifier if the user manual does not indicate it is bridgeable. Furthermore, some amplifiers come bridged internally, so attempting to bridge it further will only do more harm. As such, always double-check the specifications of your amplifier before you attempt any bridging work.
Step 2# Locating the subwoofer terminals
For you to bridge a 4 channel amp to one subwoofer, you’ll need to ensure that there is a signal on all channels of the amp. In addition, you may want to find of way of ensuring that the amplifier is delivering the same signal to the bridged channels. The easiest way around this is using a Y-adapter to tap into the bridged amplifier channels.
This adapter is specially designed to let you wire up each bridged channel to the subwoofer voice coils. When using a Y-splitter cable, you’ll need to plug one end of the wire into the SUB OUT port at the back of the amplifier. On the other hand, the two Y-splitter ends will be plugged into the RCA inputs found on the back of the subwoofer.
Step 3# Connecting the amp to the subwoofer
For this application, you’ll need to connect each channel to the designated voice coil terminals to increase the amount of power needed to drive the subwoofer. Now, using the Y-splitter cable, you can start by connecting the first set of subwoofer positive terminals to the amp’s first channel positive terminal.
Next, connect the subwoofer negative lead to the amp’s second channel negative terminal. To achieve this, you’ll need to strip the wires (you can use a wire stripper to remove about 1 inch of the wire insulation) coming from the subwoofer before you can finally secure them to the amplifier terminals.
Step 4# Connecting the final set of terminals
The same wiring scheme will apply when connecting the third and fourth channels to the subwoofer. For this step, you’ll need to run your cables from the third channel and fourth positive terminals to your subwoofer’s second set of voice coil terminals. You can use a screwdriver to clamp the cables securely into the amplifier’s terminals.
To prevent distortion, you may want to ensure that the signal transmitted to each voice coil terminal is exactly the same. At this point, the process of adding a single subwoofer is complete, and you can now go ahead and test your system.
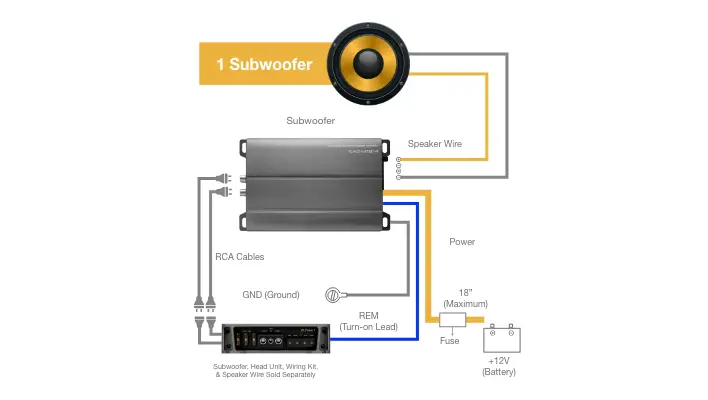
4 Channel Amp to 1 Sub Wiring Diagram
How amplifier bridging works
Ideally, bridging amplifier channels helps double the amount of power that each channel could possibly put out. Usually, this is regarded as the maximum wattage of the amplifier, and it is achieved by combining the positive signal of the first channel with the negative signal of the second channel.
For instance, if you’re looking to power a 150 watts subwoofer, you can decide to bridge a compact 4 channel amplifier rated at 30 watts RMS power per channel. Once bridged, the amplifier is capable of delivering up to 125 watts RMS which is more than enough power you need to drive the subwoofer.
In our specific scenario above, the amplifier uses the first channel positive terminal and second channel negative terminal as the output. However, in some applications, it is not uncommon to find the bridged amplifier using the first channel negative and the second channel positive terminals for the output.
If you’re using a 2 channel amp, the process is pretty much the same, but instead of wiring eight terminals, you’ll only need to connect four terminals. Bridging a 2 channel amp helps combine the channels into one but with half the resistance load (i.e. half ohm load).
With reduced resistance, the subwoofer is able to put out more current, which will, in turn, improve its efficiency. As we had mentioned earlier, it also helps send a more powerful mono signal to your subwoofer/speakers.
2 channel amp 1 sub wiring diagram
To connect a two channel amp to one subwoofer, the process is similar to that of a four channel amplifier, but the layout is going to be simpler. After you’ve identified your amplifier terminals you’ll only need to connect the positive lead of the subwoofer to the first amplifier channel positive terminal.
Next, run another wire from the subwoofer negative terminal to the negative terminal of the second channel, and you’re good to go. This connection scheme gives you an upper hand by combining the output from the two channels to provide double the output power to your subwoofer, as shown below;
For the above setup, you’ll need to get a dual voice coil subwoofer and wire it in a parallel connection (i.e. bridge the amplifier to a mono operation). For example, if you are using a 4 ohm DVC subwoofer, wiring it in parallel will present a load of 2 ohms to the amplifier.
The reduced load will, in turn maximize the amplifier output, but it often results in overheating. As such, you may want to determine if your amplifier can function optimally when the resistance load is reduced by a half.
Parting Shot!
If you’ve connected an amplifier to your car’s audio subwoofer before, then bridging a 4 channel amp for subwoofer should be relatively easy. Bridging the amplifier provides an efficient way of doubling your amplifier output while allowing you to drive more power to your subwoofer and consequently boost your bass.